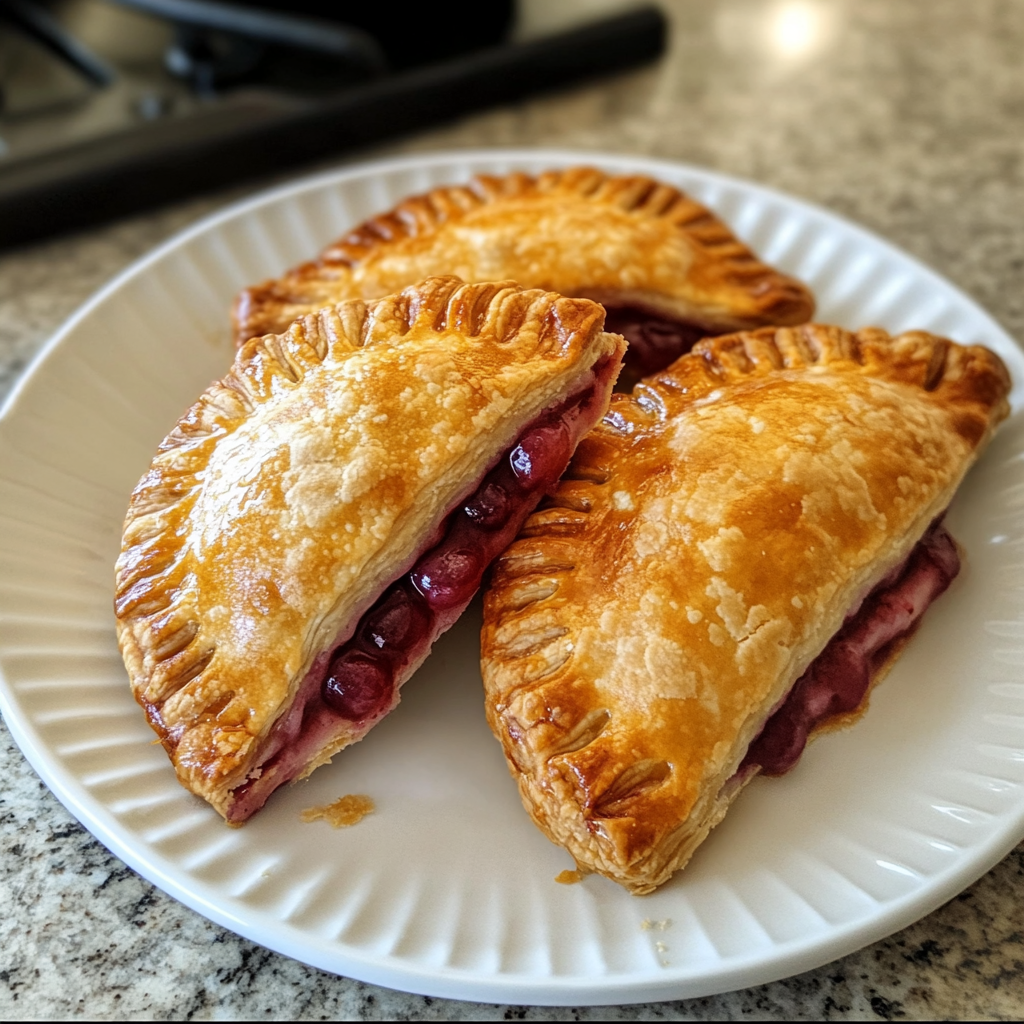
Sour Cherry Hand Pies: Portable Pastry Perfection
Indulge in the delightful fusion of buttery, flaky pastry and tangy sour cherries with these irresistible Sour Cherry Hand Pies. These portable pastries are the perfect treat for any occasion, from picnics and barbecues to lazy afternoons on the porch.
Sour cherries are the star of the show, their vibrant flavor balancing perfectly with the rich, buttery crust. Whether you’re a seasoned baker or a novice in the kitchen, these hand pies are a recipe you’ll want to add to your repertoire.
❤️ Why You’ll Love This Recipe ❓
What sets these Sour Cherry Hand Pies apart is the irresistible combination of textures and flavors. The flaky, golden-brown crust gives way to a burst of tart, juicy cherries in every bite. Plus, the individual portion size makes them easy to enjoy on the go, without the mess of a traditional pie.
Beyond their delectable taste, these hand pies are also incredibly versatile. Serve them warm with a scoop of vanilla ice cream for a decadent dessert, or enjoy them at room temperature as a portable snack. And with the option to make them ahead of time, you can always have a batch ready to go when a craving strikes.
🛒 What You Need to Prepare Sour Cherry Hand Pies ❓
• 1 teaspoon salt
• 1 cup (2 sticks) unsalted butter, chilled and cubed
• 1/4 cup ice water
• 3 cups pitted sour cherries (fresh or frozen)
• 3/4 cup granulated sugar
• 2 tablespoons cornstarch
• 1 egg, beaten with 1 tablespoon water (for egg wash)
• Coarse sugar for sprinkling (optional)
The beauty of this Sour Cherry Hand Pie recipe is that most ingredients are pantry or freezer staples. The combination of tart sour cherries and sweet sugar creates a flavor profile that has made hand pie recipes perennially popular.
📝 How to Make Sour Cherry Hand Pies Step-by-Step ❓
• Step 2: In a medium saucepan, combine the pitted sour cherries, sugar, and cornstarch. Cook over medium heat, stirring occasionally, until the mixture thickens and the cherries release their juices, about 10 minutes. Remove from heat and let cool completely.
• Step 3: Preheat the oven to 400°F (200°C). Line two baking sheets with parchment paper.
• Step 4: On a lightly floured surface, roll out one disc of dough to 1/8-inch thickness. Cut out 12 circles using a 4-inch round cutter. Place the circles on the prepared baking sheets.
• Step 5: Place a heaping tablespoon of the cooled cherry filling in the center of each dough circle. Brush the edges with the egg wash.
• Step 6: Roll out the remaining dough disc and cut out 12 more 4-inch circles. Place one circle on top of each filled bottom crust, pressing the edges to seal. Crimp the edges with a fork to create a decorative pattern.
• Step 7: Brush the tops of the hand pies with the remaining egg wash and sprinkle with coarse sugar, if desired.
• Step 8: Bake for 18-22 minutes, or until the crust is golden brown. Allow to cool on the baking sheets for 5 minutes before transferring to a wire rack.
⏱️ Timing Overview
• Cooking time: 18-22 minutes
• Total time: 1 hour 10 minutes
Compared to traditional pie which can take up to 2 hours to prepare, this Sour Cherry Hand Pie recipe saves you 50% of your cooking time while delivering similar flavors.
👩🏻⚕️ Nutritional Information
Per serving (based on 12 servings):
• Protein: 3g
• Carbohydrates: 39g
• Fat: 17g
• Fiber: 1g
• Sodium: 203mg
These Sour Cherry Hand Pies provide approximately 13% of your daily carbohydrate requirements and 15% of your daily fat needs, making them not just delicious but nutritionally valuable as well.
🔄 Healthier Alternatives for the Recipe
• Lower-carb version: Substitute almond flour or whole wheat flour for up to half of the all-purpose flour in the crust.
• Dairy-free adaptation: Use a plant-based butter substitute and unsweetened non-dairy milk for the egg wash.
• Added protein: Sprinkle chopped nuts or seeds on top of the hand pies before baking.
• Boost vegetables: Mix in a small amount of grated zucchini or carrot with the cherry filling.
These modifications can reduce calories by up to 20% or adapt the recipe for specific dietary needs without compromising the fundamental flavor profile of the Sour Cherry Hand Pies.
🍽️ Serving Suggestions
• Pair with a fresh green salad for a light and satisfying dessert or snack.
• Complement the hand pies with a cup of hot tea or coffee for a cozy afternoon treat.
• For a picnic or outdoor gathering, serve the hand pies alongside a fresh fruit salad and lemonade.
• Create a dessert platter with the hand pies, chocolate-dipped strawberries, and mini cheesecake bites.
❌ Common Mistakes to Avoid
• Underfilling the hand pies: Use the recommended amount of filling to ensure a balanced ratio of crust to cherries in each bite.
• Overfilling the hand pies: Too much filling can cause the hand pies to burst open during baking.
• Skipping the egg wash: The egg wash helps create a shiny, golden-brown crust and seals the hand pies.
• Overcrowding the baking sheets: Leave enough space between the hand pies to allow for even baking and prevent them from sticking together.
🧊 Storing Tips for the Recipe
These Sour Cherry Hand Pies retain their quality remarkably well:
• Freezing unbaked: Assemble the hand pies, place them on a baking sheet, and freeze until firm. Transfer to a resealable bag or container and freeze for up to 3 months. Bake directly from frozen, adding a few extra minutes to the cooking time.
• Freezing baked: Allow the baked hand pies to cool completely, then wrap individually in plastic wrap or foil. Place in a resealable bag or airtight container and freeze for up to 3 months. Thaw at room temperature or reheat in a 350°F (175°C) oven for 5-10 minutes to restore the crisp crust.
• Reheating: For best results, reheat the hand pies in a 350°F (175°C) oven for 5-10 minutes, or until warmed through and the crust is crisp.
❓ FAQs
Can I make the hand pies ahead of time?
Absolutely! The dough can be made up to 3 days in advance and stored in the refrigerator. The assembled, unbaked hand pies can also be frozen for up to 3 months. When ready to bake, simply transfer the frozen hand pies to a baking sheet and bake as directed, adding a few extra minutes to the cooking time.
Can I use a different type of fruit instead of sour cherries?
Yes, you can easily substitute other types of fruit, such as apples, blueberries, or peaches. The filling recipe can be adapted to accommodate the sweetness and moisture content of the fruit you choose. Just be sure to adjust the sugar and cornstarch amounts accordingly.
Are these hand pies gluten-free or dairy-free?
This recipe is not inherently gluten-free or dairy-free, but you can easily adapt it to accommodate these dietary restrictions. Substitute a gluten-free all-purpose flour blend for the all-purpose flour, and use a plant-based butter substitute and non-dairy milk for the egg wash.
Why did my hand pies burst open during baking?
Overfilling the hand pies can cause them to burst open during baking. Be sure to use the recommended amount of filling, and leave enough space around the edges to allow for expansion. Additionally, make sure to crimp the edges tightly to seal the hand pies.
Can I add any extra ingredients to the filling?
Absolutely! The sour cherry filling can be customized to suit your tastes. Try adding a splash of almond extract, a pinch of cinnamon, or a handful of chopped nuts for additional flavor and texture. You can also mix in a small amount of grated citrus zest or a touch of vanilla extract.
Conclusion
These Sour Cherry Hand Pies represent the perfect balance of convenience, flavor, and presentation. Whether you’re serving them as a portable snack, a decadent dessert, or a special treat for a gathering, they’re sure to impress with their buttery, flaky crust and bursts of tangy, juicy cherries.
With simple ingredients and straightforward preparation, these hand pies demonstrate that sophisticated flavors don’t require complicated techniques – just quality ingredients and a little bit of care in the assembly. So, gather your ingredients and get ready to experience the irresistible deliciousness of Sour Cherry Hand Pies.